Build a static blog and a publication workflow with Hugo, Github, Docker and NetlifyCMS
Disclaimer: I suggest one technical solution here, and a publishing workflow that I have adopted. The strength of static websites being their great flexibility, each section is interchangeable with another one of your choice. Also, I could have used Netlify to deploy this blog. It works well with static websites using their CDN, but I didn’t want to change my root DNS.
Overview
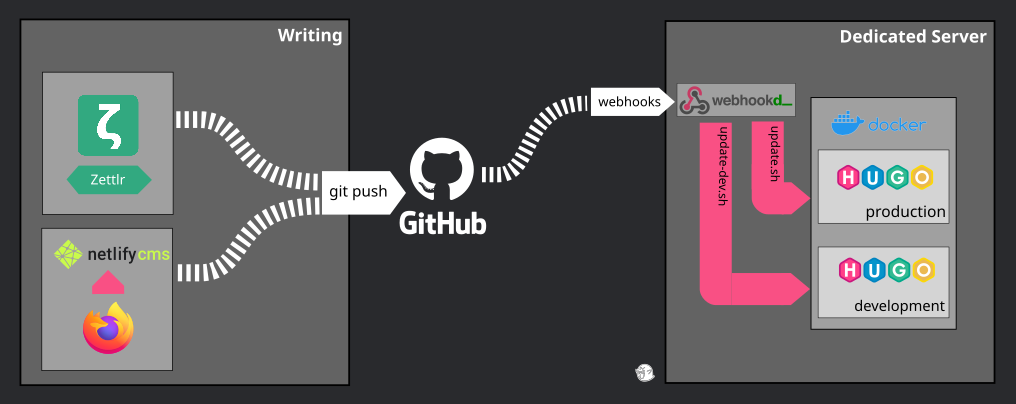
The following sections are summed up in this diagram:
The blog engine: Hugo
The heart of our workflow is the tool that will allow us to build our final website, the blog. To publish a website whose goal is to expose read-only content, static website generators are the ideal tool, due to the flexibility they provide.
Unlike a CMS (such as WordPress or Drupal) which dynamically processes every HTTP requests through backend code and/or a database, static website generators publish all HTML files that can be accessed.
For example, this article you are reading is a simple HTML file, generated from a content file written in Markdown. Also, the hugo tag is used here. It means that there is an HTML file generated containing all articles associated with this tag. The important thing to understand is that there is no server processing, we simply render static content that will be regenerated every time something is changed.
Static website generators aren’t new, but I like to give context to what I’m writing about and not assume the readers technical level.
Let’s get back to our subject here. I have chosen Hugo framework, written in Go, which is one of the most popular in the world. There are many more out there, such as Jekyll (Ruby), Gatsby (JS), Zola (Rust), Pelican (Python), Sculpin (PHP), etc.
Finally, the technical solution doesn’t really matter in the end, as long as you find a tool which covers feature requirements that you want for your blog. As an example, for this blog, my main constraint was a tool that natively supported multi-language content.
I won’t dwell on Hugo’s installation and configuration, the documentation is complete and very well written. The main goal is to be able to generate your blog in one single command line, here we simply do hugo. Graceful, isn’t it?
Local writing: Zettlr + git
Static website generators offer a great flexibility because the only thing you need to publish content is writing Markdown files.
Note: other formats than Markdown are supported but, in my opinion, it’s the easiest to use, while embedding a lot of features.
All my articles are saved in the folder /content/blog/ and match the following format: YYYY-MM-DD-article-slug.lang.md. It’s simple, readable, efficient.
For the editor, obviously everything is possible. You can write everything using ViM, VSCode, or whatever your favorite IDE is. For my part, I prefer to use Markdown specialized editor. I really feel like my productivity increases when I use a tool which provides me a great and immersive user experience.
I started to write my articles locally using Typora before I discovered Zettlr which is a delight to use. Both editors are powerful tools, but the latter handles spelling checks, automatic saves, header metadata and markdown/visual formatting better.
And of course, the whole blog project is in a git repository. More precisely, in a private Github repository with /public folder ignored. You will understand why later in this article when I will start to talk about deployment automation.
The repository is private because I usually start by taking a bunch of notes and writing succinct drafts, before having any article close to being published. Pascal Martin describes in this article [FR 🇫🇷] a workflow similar to mine, even though my writing cycle is slightly shorter.
Dockerize me
It’s time to put our brand new blog online. Once again, everyone has their own recipe. The only important thing is that we want to put our static HTML files behind a web server.
In my architecture, which I’ll describe more thoroughly in a future article, I have a set of Docker containers hosted on a dedicated server. They are all linked to an nginx reverse proxy container with automatic Let’s Encrypt SSL certificates generation.
It means that to add a new service, I just need to create a new Docker container linked to this network, usually with Docker Compose to make my life easier, and that’s it.
I don’t thinks that Hugo provides an official image, but a quick search in my favorite engine quickly redirect me to jojomi’s image, who also provides another image with nginx preconfigured to serve static files.
That’s the beauty of Docker, from there I don’t have anything else to do to have my blog running, besides writing a docker-compose.yml for convenience :
    version: '2'

    services:
      hugo:
        image: jojomi/hugo:0.74.3
        volumes:
          - ./:/src
          - /data/blog/output/:/output
        environment:
          - HUGO_REFRESH_TIME=3600
          - HUGO_THEME=hello-friend-ng
          - HUGO_BASEURL=https://hoa.ro/
        restart: always
        network_mode: bridge

      web:
        image: jojomi/nginx-static
        volumes:
          - /data/blog/output:/var/www
        environment:
          - VIRTUAL_HOST=hoa.ro
          - VIRTUAL_PORT=80
          - LETSENCRYPT_HOST=hoa.ro
          - LETSENCRYPT_EMAIL=arthur@hoa.ro
        ports:
          - 80
        network_mode: bridge
        restart: always
Then we launch the eternal:
docker-compose up -d
And that’s it. No more, no less.
Now, how can we update our content? Let’s think about doing it manually. That’s the first step of automation.
The blog is linked to our Github repository, so it just requires to pull the last changes and regenerates static content; remember that /public folder is not synchronized with Git.
A good habit to have is to always save these types of command into a script, because believe me, it’s quickly forgotten. update.sh:
#!/bin/bash

git pull origin master
docker-compose exec -T hugo hugo -d /output
You don’t even need to restart the container!
This command will execute hugo -d /output in the Hugo container, and it only takes a few seconds. Output folder is changed because it matches the Docker volume in the Compose file.
Good. I have my blog and an update script. It’s fast, and there is no service interruption. However, I don’t want to use SSH every time I want to update!
Continuous Deployment: Github’s webhook
There are as many CD (Continuous Deployment) solutions as there are detergent brands. I won’t list them all, nor analyze them here. However, I know exactly what I need:
When a new commit is pushed on the
masterbranch of my Github repository, I want to execute theupdate.shscript on my dedicated server.
Like every developer, besides looking for a solution meeting my requirements, I also want the easiest to set up. And a simple solution to trigger events after a commit are webhooks provided by Github.
A webhook is an HTTP POST request which is sent to a URL of our choice every time an event happens in the repo. Here, we are only interested in push events. Perfect, we have everything we need. We just need to process that request on our server.
Again, I try to go for the easiest solution, and I feel lucky because that’s exactly what webhookd, a tool written in Go language, is providing:
A very simple webhook server launching shell scripts.
Installation is simple, it just requires the project’s README. However, it doesn’t really explain how to use this software as a systemd service, in order to make our installation durable.
So let’s create a service called webhookd. Obviously, you might need to adapt it to your installation setup. Here, I use Debian and root is handling every no-Docker things (boo!).
/etc/systemd/system/webhookd.service:
[Unit]
Description=WEBHOOKD

[Service]
ExecStart=/root/work/bin/webhookd
User=root
Group=root
EnvironmentFile=-/root/work/src/github.com/ncarlier/webhookd/etc/default/webhookd.env
EnvironmentFile=-/root/webhookd.env
Restart=always
Type=simple
RestartSec=30s

[Install]
WantedBy=multi-user.target
/root/webhookd.env:
WHD_SCRIPTS=/root/scripts
WHD_LISTEN_ADDR=":<port>"
I have configured the tool to add al my scripts into /root/scripts, and I configured a custom port for webhookd to listen to.
Then, I created an intermediate script which adds a security token check, and launch my now famous update.sh. webhookd natively handles query parameters, so the script is pretty straightforward. /root/scripts/blog.sh:
#!/bin/bash

if [[ $token != '<token>' ]]; then
       echo "Access denied"
       exit 1;
fi

cd /path/to/blog && ./update.sh
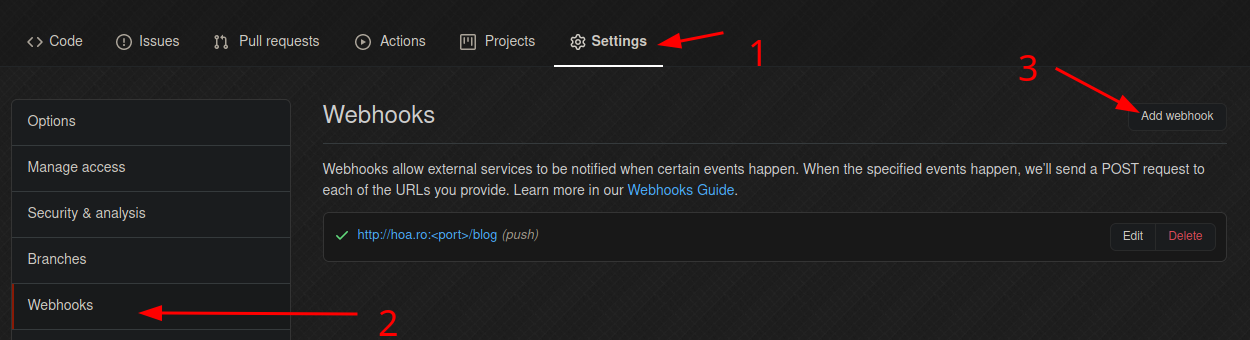
Great! My server is now able to process Github’s hooks. Let’s create them so every push on the repo will redeploy and build the static website with the latest changes.
NetlifyCMS
Everything now works like a well-oiled piece of machinery, and I’m very satisfied with this workflow. My changes appear in production after a git push in a few seconds.
But there’s still one small detail that bothers me. As I said earlier, I am very much used to take notes and make rough drafts before I actually start writing articles. And for that, having to launch an editor, a terminal, etc., can be a bit cumbersome. That’s also why I enjoy and use Shaarli so easily.
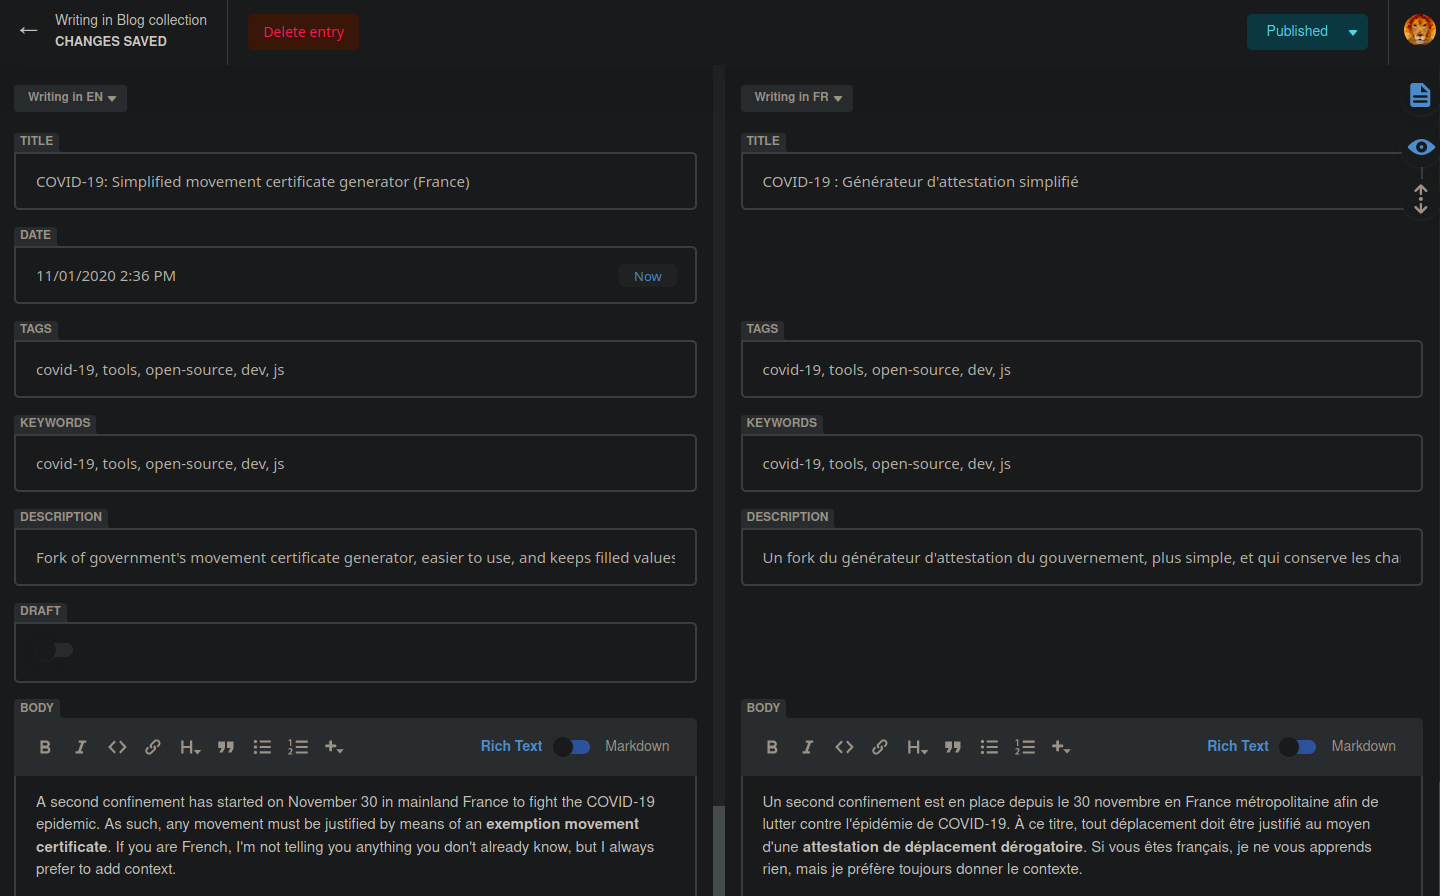
In response to this need, I discovered NetlifyCMS. It’s an open-source tool that acts like a CMS UI, but generates static content (Markdown files) and pushes it to Git in one click. It works with any static site generator, since it only relies on a TOML configuration file, and a JS file import.
In other words, we put a configuration file and an HTML file with a <script> tag in our repository, and we have an article writing interface accessible in the browser, which automatically publishes the changes in production. And the icing on the cake, it manages multi-language writing.
The documentation is pretty well done, so I won’t go into too much detail about my configuration. Here’s what it looks like with Hugo, and a theme that handles multi-languages, static/admin/config.yml:
backend:
  name: github
  repo: arthurhoaro/<repo-name>
  branch: master
media_folder: "static/img"
public_folder: "/img"
i18n:
  structure: multiple_files
  locales: [en, fr]
  default_locale: en
collections:
  - name: "blog"
    label: "Blog"
    folder: "content/blog"
    create: true
    i18n: true
    slug: "{{year}}-{{month}}-{{day}}-{{slug}}"
    fields:
      - {label: "Title", name: "title", widget: "string", i18n: true}
      - {label: "Date", name: "date", widget: "datetime"}
      - {label: "Author", name: "author", widget: "hidden", default: "ArthurHoaro"}
      - {label: "Cover", name: "cover", widget: "hidden", default: ""}
      - {label: "Tags", name: "tags", widget: "list", i18n: true}
      - {label: "keywords", name: "keywords", widget: "list", i18n: true}
      - {label: "Description", name: "description", "string", i18n: true}
      - {label: "showFullContent", name: "showFullContent", widget: "hidden", default: true}
      - {label: "draft", name: "draft", widget: "boolean", default: true}
      - {label: "Body", name: "body", widget: "markdown", i18n: true}
Drafts preview
There is still a small detail to be refined. For the proofreading phase, I prefer to do it on the final rendering rather than in the Markdown editor.
Obviously, it is possible to run the server locally with hugo server -D -F: -D to compile drafts, -F to compile files dated in the future. Except that it is not at all convenient with NetlifyCMS publishing.
Once again, I opted for a simple solution: mounting a development instance on which the drafts are accessible. The test instance is protected by basic HTTP authentication.
I invite you to go over the other sections again, but to quickly summarize: new Docker image, new update.sh script compiling the drafts, new Github webhook, new webhookd script and we’re good. Once we’ve done everything in production, this step can be done in 5 minutes.
Conclusion
This article is a little longer than I had anticipated. I think it took me longer to write it than to set up the workflow in the first place.
Anyway, you have all the keys in hand to set up your own static blog, with the writing tools and automated deployment.
I have described my workflow here, and I’ve tried to make each section modular, so that they are adaptable to your needs and uses.
Now it’s up to you! And don’t hesitate to share your improvements with me.